Somo. Adrenalina primaveral

Icono Español. Icon Spanish La primavera entró el 20 de marzo. Lejos quedan los días de invierno en los que los temporales azotaban el Mar Cantábrico. El inicio de la estación trajo lluvia y la temperatura del agua rondaba los 12 grados. Conforme la Luna va cambiando de perfil, las horas de Sol han ido aumentando; calentando el agua tibiamente. En algunas fechas posteriores se han registrado temperaturas superiores a los 20 grados. Pero el mar sigue su curso y se mide por otra escala. Actualmente el agua se encuentra en 14 grados.

El primer fin de semana de abril paró la lluvia y el Sol se reflejaba sobre la superficie del mar. La predicción de olas estaba entre 1 y 2 metros de altura, así que el viaje hasta Somo transportaba buenas sensaciones. Pocos aparcamientos libres y mucha gente se agolpaba a lo largo del paseo que roza la arena. Los efectos del invierno que los edificios mostraban captaban la atención de los paseantes y al fondo un goteo de surfers se encaminaba a la playa con impaciencia. Nos dirigimos hacia el mismo lugar. Una especie de trance impregnaba el recorrido. El sonido de las olas iba creciendo. Al entrar en la playa vimos como una ola rizada cruzaba de izquierda a derecha. Una sonrisa y al agua.

Nacían las olas a media distancia y su trayecto se marcaba hasta la orilla. Allá que nos fuimos. Allí que llegamos. Soplaba un viento que esculpía las olas presentadolas como una pared de agua. A los cinco minutos una ola asomó a lo lejos y fue cogiendo tamaño. Cuando llegó hasta nuestra posición alcanzaba los dos metros. Remando con fuerza conseguí viajar en la cima. La cresta no cedía y mantenía el muro de agua unos metros más. La sensación de vértigo inicial disparó la adrenalina cuando fui consciente de ello. Me deslicé a la izquierda dibujando media luna. Regrese hacia la ola para chocar con la pared y volver a bajar. El agua a mi alrededor bullía. Eran las olas, era la mar, el Sol que radiaba, era la pasión que llegaba al corazón.

Somo. Spring adrenaline

Icono Inglés. Icon English The spring entered on March 20. The winter days in which the storms broke the Cantabrian Sea were far away. The beginning of the station brought rain and the temperature of the water was about 12 grades. The same way as the Moon was changing profile, the hours of the Sun had been increasing and the water was warming indifferently. In some later dates there were registered temperatures up to 20 grades. But the sea continues its course and its measures has another scale. At present the water is in 14 grades.

The first weekend of April the rain had stopped and the Sun reflected on the surface of the sea. The prediction of waves was between 1 and 2 meters in height, so the trip to Somo was carrying good sensations. Few parking free and many people lined up along the walkway that rubs against the sand. The effects of winter that the buildings showed captured the attention of passers-by. At the end of the image some surfers went to the beach with impatience. We headed toward the same place. A sort of trance permeated the tour. The sound of the waves grew. Upon entering the beach we saw as a wave curly crossing from left to right. One smile in each one and we went to the water.

The waves had borned at half distance and its trajectory was marked up to the shore. There was where we went . There was where we arrived. There was a wind that was sculpting the waves and showing it to us like a water wall. In a few minutes a wave began to be shown in the distance and it was taking size. When it came even our position was reaching two meters. Paddling strongly I managed to travel in the top. The crest was not broken and the water wall was maintaining some meters more. The sensation of initial dizziness shot the adrenaline when I realized it. I slid to the left through a maneuver like a half moon. I Returned towards the wave to ride with the wall and to went down again. The water around me was boiling. There were the waves, it was the sea, the Sun that it was lighting, it was the passion that was coming to the heart.

Separador. DividerSomo.  Surf SpringIcono separador. Icon divider

Icon close Sponsor

Share

Playa de Mataleñas. Una cala dentro de Santander

Icono Español. Icon Spanish La playa de Mataleñas está situada en la ciudad de Santander. Se encuentra emplazada entre Cabo Menor y Cabo Mayor. Su arenal tiene 125 metros de longitud y una anchura aproximada de 40 metros. Flanqueada por acantilados que esculpe el Mar Cantábrico, estas barreras naturales acompañan a la cala 250 metros antes de llegar a mar abierta.

Localización : una vez situados en la ciudad de Santander, nos dirigiremos hacia la Segunda Playa del Sardinero. Desde allí cogemos dirección al Faro de Cabo Mayor. Pasado el Barrio de Valdenoja, subiendo la cuesta, al final hay un desvío a mano derecha que da acceso a un mirador desde donde contemplar parte de la Bahía de Santander y la Playa de Mataleñas.

Acceso : cuenta con un pequeño parking cercano a su escalinata de entrada. Se baja a la playa a través de las escaleras que traducen una altitud de 40 metros, hasta amenizar a nivel del mar, en un pequeño balcón abarandillado que nos presenta la cala de una forma singular.

La playa de Mataleñas es apta para el baño, ir de comida, pesca a surfcasting y el submarinismo. Sus aguas limpias y de color azul verdoso traslucen parte del paisaje submarino que puede encontrarse al bucear en la zona. Lubinas, doradas, perlas, cabras, cabrachos y agujones son algunas de las especies de peces que vamos a encontrar. Acompañados de crustáceos y algas rodeados por cuevas y roca tallada por el Cantábrico.

La playa de Mataleñas se comunica con los siguientes puntos : Faro de Cabo Mayor, Cabo Menor, Parque de Mataleñas, recorrido periférico del Campo de Golf de Mataleñas, El Sardinero. Es por ello que se convierte en una zona ideal para realizar rutas de senderismo con diversos recorridos.

Separador. DividerIcono Español-Inglés. Icon Spanish-Englishaccess, localization: mataleñas beachIcono separador. Icon divider

Beach of Mataleñas. A cove within Santander

Icono Inglés. Icon English The Beach of Mataleñas is located in the city of Santander. It is placed between Cabo Menor and Cabo Mayor. Its arenal has 125 meters in length and a width of approximately 40 meters. Flanked by cliffs that sculpts the Cantabrian Sea, these natural barriers accompany the cove through 250 meters before arriving to open sea.

Location : once placed in the city of Santander, we go toward the Second Sardinero Beach. From there take the road to the Lighthouse Cabo Mayor. Then the last neighborhood, Valdenoja. Just up the hill, at the end, there is a diversion on the right hand which gives access to a vantage point from where you can watch part of the Santander Bay and the Beach of Mataleñas.

Access : account with a small parking close to its entrance staircase. You can arrive to the beach through the stairs. That translate an altitude from 40 meters to sea level. At the end, an small balcony balustraded presented to us the cove in a singular way.

The beach Mataleñas is suitable for the bathroom, picnic, surfcasting and scuba diving. Its clean waters and greenish blue color show part of the underwater scenery that can be found when diving in the area. Sea Bass, golden, pearls, goats, scorpion fish and agujones are some of the species of fish that we are going to find. Accompanied by crustaceans and algae surrounded by caves and rock carved by the Cantabrian Sea.

The beach of Mataleñas communicates with the following points: Lighthouse Cape Mayor, Cape Menor, Mataleñas’s Park, peripheral road of Mataleñas’s Golf course, The Sardinero. It is for it that turns into an ideal zone to realize routes of trekking with diverse tours.

Icon close Sponsor

Share

Criterios para elegir un bodyboard

Icono Español. Icon Spanish Elegir un bodyboard no es algo sencillo debido a los parámetros que componen su diseño y a todas las combinaciones que pueden generar. Por ejemplo para 4 factores a tener en cuenta ( que pueden ser muchos más) combinados entre sí generan 256 bodyboards distintos. A esto se suma la gran variedad de fabricantes y que cada uno cuenta con una amplia gama de modelos. ¿ Cómo elegir ? . La principal orientación sobre esta decisión la marca el uso que de él vamos a hacer. Para ello los principales parámetros son los siguientes :

1 – Tallaje.
2 – Partes de un bodyboard.
3 – Materiales.

1 – Tallaje : el sistema de tallas se establece en pulgadas (1 pulgada = 2,54 cm) y nos sirve para conocer que talla es la más adecuada para cada uno. Éste es el criterio básico para elegir un bodyboard. Pues si la talla es grande respecto del surfer, no permite maniobrar. Si por el contrario es pequeña, sólo funcionará con las olas más potentes; perdiendo estabilidad y seguridad.

Separador. DividerIcono Español-Inglés. Icon Spanish-English

Size – length (inch) Height (cm) Weight (kg)
37″ 123-153 cm 28-55 kg
37.5″ 130-155 cm 30-55 kg
38″ 135-155 cm 35-58 kg
38.5″ 138-158 cm 36-58 kg
39″ 137-158 cm 38-58 kg
39.5″ 140-162 cm 40-60 kg
40″ 157-167 cm 42-62 kg
40.5″ 158-170 50-80 kg
41″ 160-173 cm 55-85 kg
41.5 165-179 cm 60-90 kg
42″ 168-183 65-95 kg
42.5″ 170-190 cm 70-100 kg
43″ 172-195 70-105 kg
44″ 175-195 cm 75-130 kg
45″ 175-195 cm 75-130 kg
46″ + 195 cm + 100 kg

Icono separador. Icon divider

2 – Partes de un bodyboard.

Separador. DividerIcono Español-Inglés. Icon Spanish-EnglishDibujo Partes BodyboardIcono separador. Icon divider

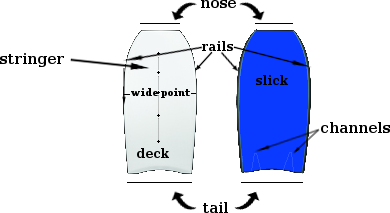
Nose (pico): parte superior. Si es más ancho nos permite situar el peso hacia adelante, para surfear tumbado (prone). Si es más estrecho favorece desplazar el peso hacia atrás, para surfear de rodillas (dropknee).
Tail (cola): parte inferior. Cada tipo de cola está indicado para un tipo de olas y maniobras diferentes. Las dos grandes categorías son : crescent tail y bat tail. Dentro de cada categoría hay muchas variantes. Las principales categorías son :

  • Crescent tail : para olas grandes, el bodyboard se acopla bien a la pared de la ola.
  • Bat tail : aportan mayor maniobrabilidad, pero el bodyboard pierde acoplamiento en la pared de la ola.

Separador. DividerIcono Español-Inglés. Icon Spanish-EnglishTipos  colas de bodyboardIcono separador. Icon divider

Wide point : parte más ancha.

Deck : cara sobre la que se tumba el surfer.

Slick : cara que va en contacto con el agua.

Rails (bordes): bordes laterales del bodyboard, superiores e inferiores. Estos bordes se figuran en forma de ángulo siendo su parte inferior y superior separadas por el punto de inflexión. Cumplen la función de quillas, anclan nuestra trayectoria al camino de la ola, cuando cortamos la ola. Su medidas habituales son: (borde inf.)60/40(borde sup.) y 50/50. Cuanta mayor diferencia existe entre estas medidas hay mayor acoplamiento a la pared de la ola.

Stringer : listón flexible y duro generalmente de carbono. Colocado en el interior verticalmente, para proporcionar mayor resistencia al bodyboard.

Channels (canales) : proporcionan mayor acople a la ola, disminuyen ligeramente la maniobrabilidad.

– Diferencia entre nose y wide point : proporciona mayor capacidad de giro según el valor aumenta.

3 – Materiales.

Los materiales usado para constuir un bodyboard se centran principalmente en tres partes, cada una de ellas tiene una gama de calidades.

  • Slick : (de mayor a menor calidad) surlyng, HDPP, HDPE.
  • Deck : (para gustos)
    • Sealed-air: célula abierta, es más blando.
    • Crosslink : célula cerrada, no absorbe agua y es más rígido.
  • Core : es la parte interna del bodyboard. Las calidades, de menor a mayor; son las siguientes :
    • Dow : blando y pesado, baja calidad.
    • PE (Polietileno) : es más pesado que PP. Adecuado para aguas frías.
    • EFC (Engineered Flexible Core): evolución de PE, mantiene sus propiedades; siendo más ligero y
      totalmente impermeable.
    • PP (Polipropileno) : muy ligero. Adecuado para aguas calientes. Alta calidad.

Nota : tener precaución al colocar el invento (correa elástica de sujeción) para no dañar ninguna parte del bodyboard (stringer).

Resumen: estos son los principales criterios para elegir un bodyboard. Tener en cuenta que la calidad está relacionada con el precio, aunque esto no siempre se cumple. Debido a la durabilidad de un bodyboard quizás es recomendable aumentar la cantidad a invertir, primando calidad y funcionalidades; dependiendo del uso y nuestra frecuencia de surf, pero esta decisión corresponde a la libre elección de cada uno.

Criteria for choosing a bodyboard

icono bandera Reino UnidoTo choose a bodyboard is not something simple because of the parameters that make up its design and all the combinations that can be generate. For example for 4 factors to take into account ( which can be many more) generate 256 different bodyboards. This is compounded by the wide variety of manufacturers and that each one have a wide range of models. How do you choose? . The main guidance on this decision are the place and style that we’re going to play. The main parameters are the following ones :

1 – Sizing.
2 – Parts of a bodyboard.
3 – Materials.

1 – Sizing: the system of sizes settles down in inches (1 inch = 2,54 cm) . It allow us to know the size that is the most appropriate for each one. This one is the basic criterion to choose a bodyboard. If the size is bigger than the ideal one for the surfer, it does not allow to maneuver. If on the contrary it is small, only it will work with the most powerful waves; with less stability and safety.

Size chart. See above.

2 – Parts of a bodyboard.

Bodyboard parts Picture. See above.

Nose (peak): top. When it is width enables us to place the weight forward, to surfing down (prone). The small width of it allow us to place the weight backwards, to surf over the knees (dropknee).

Tail (queue): bottom. Each type of tail is indicated for a kind of waves and different maneuvers. The two major categories are : crescent tail and bat tail. Within each category there are many variants. the main categories are:

  • Crescent tail : for big waves, the bodyboard attaches securely to the wall of the wave.
  • Bat tail : delivering greater maneuverability, but loses the bodyboard coupling on the wall of the wave.

Tails Picture. See above.

Wide point : widest part.
Deck : face on the surfer.
Slick : side to be in contact with water.
Rails : side edges of the bodyboards, upper and lower. These edges are contained in the form of angle being their top and bottom separated by the inflection point. Them play the role of keels, anchored our path to the path of the wave, when we cut off the wave. Its customary measures are: (bottom )60/40 (top) and 50/50. The difference between these measures increase the coupling to the wall of the wave.

Stringer : stick generally flexible and hard, usually manufactured in carbon. Placed inside the bodyboard and vertically, to provide greater resistance for the bugui.

Channels : provide greater union to the wave. Them slightly diminish the maneuverability.

– Difference between nose and wide point : provides more maneuverability according to the increase of the value.

3 – Materials. The materials used to build a bodyboard is focused mainly in three parts, each one of them has a range of qualities.

  • Slick : (from highest to lowest quality) surlyng, HDPP, HDPE.
  • Deck : (to taste)
    • Sealed-air: open cell, is softer.
    • Crosslink : closed cell, does not absorb water and is more rigid.
  • Core : is the internal part of the bodyboard. From lowest to highest quality ; them are the following :
    • Dow : soft and heavy, low quality.
    • PE (Polyethylene) : it is heavier than PP. Suitable for cold waters.
    • EFC (Engineered Flexible Core): evolution of PE, maintains its properties; still more lightweight and
      completely waterproof.
    • PP (Polypropylene) : very lightweight. Suitable for hot waters. High quality.

Note: Use caution when placing the leash not to damage any part of the bodyboard (stringer).

Summary: these are the principal criteria to choose a bodyboard. Bear in mind that the quality is related to the price, though this not always is fulfilled. Due to the durability of a bodyboard probably it is advisable to increase the quantity to invest, giving priority to quality and functionalities; depending on the use and our frequency of surfing, but this decision corresponds to the free choice of each one.

Icon close Sponsor

Share

Isla de Mouro, origen del nombre

Icono Español. Icon Spanish El origen del nombre de Isla de Mouro se remonta al siglo XVIII que es cuando se realiza el primer Atlas Hidrográfico de España. En ese libro se incluían todas las islas de nuestro páis, entre las que se encontraba la que hoy conocemos como Isla de Mouro. Su nombre original era Isla de Mogro, pero debido a un error en la transcripción hecha por el cartógrafo Vicente Tofiño de San Miguel, se registro el nombre Isla de Mouro, que se ha conservado hasta nuestros días.

La palabra «Mogro» designa a una localidad costera cantabra próxima a Santander. Su significado es sinónimo de «castro«, el cual se refiere a poblado fortificado celta, generalmente prerromano. La palabra castro proviene del latín «castrum«, que significa fortificación militar.

Island of Mouro, origin of the name

Icono Inglés. Icon English The origin of the name of the Island of Mouro goes back to the eighteenth century that is when the first Hydrographic Atlas of Spain had been done. In that book were included all the islands of our country. Among the islands, Mouro Island. Its original name was Island of Mogro, but due to an error in the transcript by the cartographer Vicente Tofino of San Miguel, the name of Island of Mouro was recorded and it has been preserved until our days.

The word «Mogro» designates a Cantabrian coastal town next to Santander. Its meaning is a synonym for «castro«, which refers to Celtic oppidum, pre-roman generally. The word castro comes from the latin «castrum«, which means military fortification.

Icon close Sponsor

Share

Cómo elegir un traje de surf

Icono Español. Icon Spanish Elegir un traje de surf es una decisión que vamos a disfrutar o padecer durante varios años. Todo ello depende de tomar la opción más adecuada para cada uno.

En este artículo expongo mi punto de vista y experiencia al respecto. Deseando que pueda servir de guía a la hora de comprar un traje de surf.

Parámetros para una buena elección :

  1. Utilización
  2. Tallaje
  3. Medidas
  4. Grosor
  5. Tipos de trajes

1. Utilización. ¿ En que época del año vamos a usar el traje ? . Según la estación del año en la que practiquemos surf el grosor del traje y su tipo varían. Las variaciones incluyen trajes: largo o cortos, distintos grosores en milímetros del neopreno, elaboración del traje: sellado o costuras planas …

2. Tallaje. Las tallas de los trajes de surf vienen determinadas por las marcas. Prácticamente todos los fabricantes tienen su propio tallaje. Esto no significa que no sean equivalentes entre las distintas métricas. Pero si que podemos encontrar diferencias entre tallas en principio similares.

3. Medidas. Se trata de de obtener una imagen holográfica de nuestro contorno corporal a partir de unas mediciones hechas en centímetros o pulgadas (1 pulgada = 2,54 centímetros). Los datos más importantes son los siguientes :

  • Estatura
  • Peso, kg/LB (1 kg = 2 lb)
  • Pecho
  • Cintura
  • Pelvis (parte inferior de la cadera)

4. Grosor. Este parámetro esta muy relacionado con la temperatura del agua. Tabla orientativa (milímetros – Grados Centígrados):

  • 2 mm : 17-21
  • 3 mm : 14-17
  • 4 mm : 10-14
  • 5 mm : 8-10
  • 6 mm : 8 ó menos

Nota: los trajes de surf no tienen generalmente toda su superficie con el mismo grosor. Por ejemplo si su grosor es de 4 mm, se refiere al grosor de las piernas y el pecho, los brazos 3 mm. Hay que tener esto en cuenta. Es por ello que se pueden acompañar de guantes, escarpines y gorro; según sea necesario.

5. Tipos de trajes. Principales criterios :

  • Corto ó largo. Cualquier combinación respecto a la cobertura del cuerpo.
  • Costuras planas, ciegas o selladas (Mayor aislamiento de derecha a izquierda).
  • Cremallera : en la espalda( más cómodo de poner) o en el pecho( entra menos agua).

Consejo : el traje de surf debe quedar ajustado y que nos permita respirar cómodamente. Prestar atención al material de ciertas partes del traje, el cuello es preferible que sea hipoalergénico.

How to choose a wetsuit

Icono Inglés. Icon English When you choose a suit of surf is a decision that we are going to enjoy or suffer for several years. All of this depends on taking the most appropriate option for each one.

In this article I explain my point of view and experience in this regard. Looking forward that can serve as a guide to buying a suit of surfing.

Parameters for a good choice :

  1. Purpose
  2. Sizing
  3. Measures
  4. Thickness
  5. Type of wetsuits

1. Purpose. What time of year we are going to use the costume ? . According to the season of the year in which we practice surfing the thickness of the wetsuit and its type are different. Variations include: wetsuits long or short, different thicknesses in millimeters of the neoprene, development of the wetsuit: sealing or flat seams …

2. Sizing. The sizing of the wetsuits are determined by the marks. Virtually all manufacturers have their own scale . This does not mean they are not equivalent between the various metrics. But we could find differences between the same size with different brands.

3. Measures. This is to obtain a holographic image of our body contour from a few measurements made in inches or centimeters (1 inch = 2.54 centimeters). The most important data are the following :

  • Height
  • Weight, kg/lb (1 kg = 2 lb)
  • Chest
  • Waist
  • Pelvis (bottom of the hip)

4. Thickness. This parameter is closely related to the temperature of the water. Indicative Table (millimeters – degrees Celsius):

  • 2 mm : 17-21
  • 3 mm : 14-17
  • 4 mm : 10-14
  • 5 mm : 8-10
  • 6 mm : 8 ó menos

Note: the wetsuits do not usually have their entire surface with the same thickness. For example if its thickness is 4 mm, refers to the thickness of the legs and chest, the arms, 3 mm. This needs to be taken into account. That is why you can accompany of gloves, boots and hat; as needed.

5. Types of wetsuits. Main concepts:

  • Short or long. Any combination for coverage of the body.
  • Flat seams, blind or sealed (greater isolation from right to left).
  • Zip : in the back( more convenient to put) or in the chest( enters less water) .

Advise : the wetsuit should be tight and must to allows us to breathe comfortably.

Icon close Sponsor

Share

Isla de Mouro

Icono Español. Icon Spanish La Isla de Mouro se encuentra ubicada a la entrada de la Bahía de Santander. Está situada entre La Península de la Magdalena y la Isla de Santa Marina. Ocupa un espacio de 1,7 hectáreas. Formada por rocas que acantilan todo su contorno, en su parte alta es prácticamente llana y cuenta con un faro que en la actualidad está automatizado, llamado Faro de La Isla de Mouro.

Es un lugar ideal para practicar submarinismo por la riqueza de sus fondos. Tiene una flora abundante y variada. Destaca la presencia de una planta, el hinojo marino. Es una especie muy utilizada como condimento gastronómico. Ya en el siglo XVI los buques franceses, ingleses y flamencos en su camino de vuelta desde Santander se aprovisionaban de ella en la Isla de Mouro.

La Isla de Mouro cuenta con una población de aves que nidifican en ella. Las especies de peces que la habitan y visitan es abundante, pues a la riqueza de sus fondos marinos se añade su emplazamiento. A la entrada de la bahía y próxima a su canal. Registra una gran parte de las especies de peces que se pueden encontrar en el Mar Cantábrico.

Destaca como hecho histórico la conquista de la isla por parte de los ingleses a la tropas napoleónicas, durante la Guerra de la Independencia Española (1808 – 1814). Siendo Inglaterra aliada de España.

Mouro Island

Icono Inglés. Icon English The Mouro Island is located at the entrance to the Bay of Santander. It is placed between the Peninsula of la Magdalena and the Santa Marina Island. It occupies an area of 1.7 hectares. Formed by rocks that acantilan all around, in its upper part is virtually flat and with a lighthouse which is now automated, called Lighthouse of Mouro Island.

It is an ideal place to practise diving for the wealth of its funds. It has an abundant and varied flora. It emphasizes the presence of a plant, the marine fennel. It is a species much used as gastronomic seasoning. Already in the XVIth century the French, English and Flemish ships in its way back from Santander were supplied of it in the Island of Mouro.

The Mouro Island has a population of birds that nest in it. The species of fish that inhabit and visit it is abundant, because of the wealth of its seabed and its location. At the entrance to the bay and next to its channel. Registers a large part of the fish species that can be found in Cantabrian Sea.

Stands out as historical fact the conquest of the island by the British to the Napoleonic troops, during the Spanish War of Independence (1808 – 1814). Being England ally of Spain.

Separador. DividerIcono Español-Inglés. Icon Spanish-English
islademouro
islademouro2Icono separador. Icon divider

Icon close Sponsor

Share

El arco de las olas

Icono Español. Icon Spanish El arenal en el que está incluida la Playa de Somo tiene una extensión de 7 km. Desde el punto medio de este extenso arenal, situados en tierra firme y volviendo la mirada hacia la izquierda se encuentra la Playa del Puntal. A la derecha la Playa de Loredo. Prácticamente en todo el recorrido se puede practicar surf. Además hay varias zonas donde la frecuencia y la calidad de las olas componen un área a modo de circuito. Existen varios de estos puntos y cada uno tiene olas diferentes.

Entre la entrada principal de la Playa de Somo y la «Curva» de Loredo, la arena y el mar se dibujan en una recta de 500 metros; con un parque dunar a su espalda. Se lo conoce como Pinar de Arna. Con un pequeño parking a su entrada y separado del pinar por una valla de madera. Es un lugar ideal para realizar senderismo e ir de comida a la playa. Al fondo unas impresionantes vistas componen un cuadro único compuesto por la ciudad de Santander a un lado, la Isla de Mouro en la parte central vigilando la bahía, y la Isla de Santa Marina cerrando la composición en el otro lado. Todo ello unido por el mar. El mar que baña la tierra, las rocas y las islas. Uniendo todo el espacio y desapareciendo con la línea del horizonte.

En la entrada del parque, a la derecha de la vaya, existe un camino que conduce directamente a la playa. Delimitado por rocas dispuestas en línea recta que indican la dirección adecuada. El trayecto se hunde irregularmente y transcurre en un estado natural y salvaje. Próximo a su final, un árbol inclinado sobre el recorrido dibuja un arco cerrado por la vegetación y el entorno. Dentro de él una ventana se abre. Las olas se ven llegar y el sonido orquesta el mayor de los estímulos para practicar surf y disfrutar de la naturaleza. Sólo un desnivel de 20 metros separa el final del pinar, de la playa. Bajando por un tobogán de arena que exige precaución y buena condición física se llega a donde uno antes imaginaba.

The arc of the waves

Icono Inglés. Icon English In The arenal which is placed the Somo Beach has an extension of 7 km. From the mid-point of this extensive stretch of sand, on land and looking to the left is El Puntal Beach. To the right is Loredo Beach. In virtually all parts of the route can be surfing. In addition there are several areas where the frequency and quality of the waves make up an area by way of circuit. There are several of these points and each one has different waves.

Between the main entrance of the Playa de Somo and the «Curve» of Loredo, sand and sea are drawn in a straight line of 500 meters, with a dune park to its back. It is known as Pinar Arna. With a small parking lot to its entry and separate from the pine forest by a wooden fence. It is an ideal place for hiking and go for lunch to the beach. At the end, a breathtaking views make up a picture consisting of the city of Santander to one side, Mouro Island in the central part watching the bay, and the Santa Marina Island closes the composition on the other side. All of this kingdom is met by the sea. The sea that bathes the land, the rocks and islands. Uniting all the space and disappearing with the horizon line.

At the entrance to the park, to the right of the go, there is a path that leads directly to the beach. Bounded by rocks arranged in a straight line to indicate the right direction. The journey is irregularly and takes place in a natural and wild state. Next to its end, a tree leaning over the tour draws a bow closed by the vegetation and the environment. Within it a window opens. The waves arrive and the sound produce a powerfull stimuli for surfing and enjoy the nature. Only a drop of 20 meters separates the end of the pine forest to the beach. You can go down through a waterslide of sand that requires caution and good physical condition. Then you are going to be in a place that you have imagined before.

Separador. DividerIcono Español-Inglés. Icon Spanish-English

Arco de las Olas, a lo lejos
Arco de las Olas, entrada

Icono separador. Icon divider

Icon close Sponsor

Share