De Liencres a Portio. Ruta de senderismo
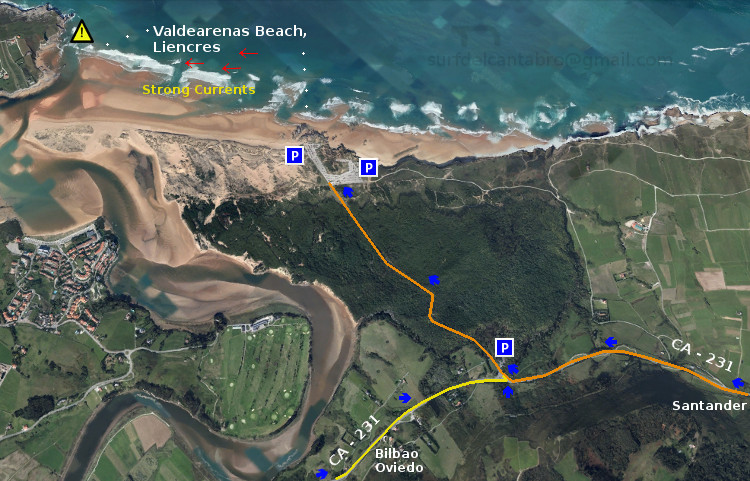
Icono Español. Icon Spanish. De Liencres a Portio La Playa de Valdearenas está ubicada en el municipio de Liencres y es conocida también por el nombre de su localidad. Los accesos a la playa cuentan con dos amplias zonas de aparcamiento. El parking situado más a la derecha da acceso a una carretera comarcal que se extiende a lo largo de 3 km hasta llegar a la Playa de Portio.

Allí empieza una ruta que avanza paralela a la costa. Esta zona es una parte de la Costa Quebrada, que va desde las Dunas de Liencres hasta la Península de la Magdalena, en Santander. El camino lo podemos realizar por la carretera. Tiene esta un escaso transito de vehículos fuera de la estación estival. La otra opción consiste en seguir un pequeño sendero marcado en el recorrido por el paso de los caminantes y que se localiza cercano a los acantilados.

El primer tramo transita cercano a una parte del Pinar de Liencres. En el pinar contrasta la altura de su árboles y sus colores con el tono cobrizo del suelo del bosque. Lecho formado por las hojas secas de los pinos. Esta imagen provoca la reminiscencia de una parte del antiguo bosque cántabro, presente en todo el territorio hasta llegar al mar. Hay pequeñas cuestas y suaves descensos que sirven de calentamiento para el resto de la ruta. Al otro lado se encuentra la Playa de Canallave. De pequeña extensión, cuenta con un arenal amplio salpicado de rocas modeladas por el oleaje. Comienza aquí el disfrute del paisaje y la imaginación.

La segunda parte del recorrido se hace a campo abierto. Rodeado de verde pradera hasta donde alcanza la vista. Mirando los prados, y siguiendo su línea, encontramos el Monte Tolio que acota esta semillanura. Siguiendo el sendero aparece un descenso que finaliza casi a nivel del mar. Desde este punto asoma una parte de la Playa del Madero. Continuando, después de una ligera cuesta, empieza la pedregosa entrada a esta especial cala. Colocada en el trazo interno del acantilado que la mar ha esculpido y delimitado del oleaje por una pared vertical de roca antigua. Para finalizar este tramo el camino elevado nos conducirá hasta la Playa de Somocuevas. Tiene un dificultoso acceso y la rodea un marco único que baña la playa por este y oeste.

El último tramo se realiza recorriendo el borde de la ensenada que baña las playas y calas que en ella existen. La Playa de las Cerrias se va acercando a cada paso. Descubre esta pequeña cala una zona de baño colocada dentro de la ensenada. 200 metros después está Llatas. La cala que muestra, por efecto de la erosión del mar, la base del acantilado. Finalmente llegamos a la Playa de Portio. La de mayor extensión y protegida por un respaldo rocoso en forma de media luna, vestigio de la forma prehistórica de esta parte de la costa.

Consejo : tener precaución.

Liencres to Portio. Trekking route

Icono Inglés. Icon English Valdearenas Beach is located in the municipality of Liencres and is also known by the name of its locality. The accesses to the beach are equipped with two large parking areas. From the parking that is located more to the right gives access to a county road that stretches along 3 km until you reach the Portio beach.

There begins a path that moves parallel to the coast. This area is a part of The Quebrada Coast, that goes from The Dunes of Liencres up to the Peninsula de la Magdalena, in Santander. The route can be perform through the road. It has a little transit of vehicles outside of the summer season. The other option is to follow a small trail marked on the route through the passage of the walkers and that is located close to the cliffs.

The first stage passes close to a part of the Pinar de Liencres. In the Pine forest contrasts the height of the trees and their colors with the coppery hue of the forest floor. The bed is formed by the dry leaves of the pines. This image is reminiscent of one part of the old cantabrian forest, present in the whole territory until reaching the sea. There are small hills and mild reductions that serve as a warm-up for the rest of the path. On the other side is placed Canallave Beach. It has a small extension, arenal account with a large rock-strewn modeled by the swell. Starts here the enjoyment of the scenery and the imagination.

The second part of the trip is done in the open countryside. Surrounded by green meadow as far as the eye can see. Looking the meadows, and following its line, we find the Mount Tolio limiting this plain. Continuing the path that end lower, almost at sea level. From this point overlooking a part of the Madero Beah. Then a slight hill begins the pebbled entrance to this special cove. Positioned in the stroke internal of the cliff that the sea has sculpted and it is protected of the surf by a vertical wall of old rock. To finish this stretch of the elevated road will lead us to the Somocuevas Beach. Has a difficult access and the surrounds a single framework that bathes the beach by east and west.

The last stretch is realized covering the rim of the big cove that bathes the beaches that in it exist. The
Beach of the Cerrias is approaching every step. There discovers this small cove an area of bath placed inside the big cove. 200 meters later is Llatas. The cove that shows, for effect of the erosion of the sea, the base of the cliff. Finally we come to the Beach of Portio. That of major extension and protected by a rocky support in the shape of half moon, trace of the prehistoric form of this part of the coast.

Advice: take caution.

icono separador forja, aperturaicono español-inglés en horizontalLiencres,Portio: routeicono separador forja, cierre

Icon close Sponsor

Share

Gigantes

Icono Español. Icon Spanish Gigantes de 3 metros cargados de energía golpeaban la costa a lo largo de la línea de playa desde Somo hasta Loredo. Llegar a donde nacían la olas era difícil. La mar, con cada ola, empujaba hacia la orilla y la corriente menguaba la remada. Un manto de espuma cubría parte del agua y el fondo de arena era removido. El agua teñida de un ligero tono anaranjado avisaba de la dureza del día.

las predicciones de olas insitu superaban las expectativas. Ya en la playa, a punto de entrar a surfear, la visión de un escenario de este tipo dispara la adrenalina. Al contacto con el agua, el mar deja entrever su temperamento. Pasados los primeros 50 metros el esfuerzo se economiza y la precaución se extrema. Con cada ola que atravesaba me iba acercando de nuevo a la orilla. Su altura de un metro largo permitía ver a lo lejos grandes masas de agua que ocultaban la visión de la Isla de Mouro. Pasada la serie de olas un tiempo de tensa calma se sucedió. Al fondo vi una ola de gran tamaño romperse sobre sí misma, redujo su volumen y avanzó. Cerca de mi posición se elevaba sobre 1,5 metros y comenzaba a abrir a izquierdas de nuevo. Orientado hacia la ola, cuando me elevó reme con fuerza e incline mi peso hacia adelante, giré hacia la cresta cortando la ola. Dibujando el trazado en el recorrido, el sonido del cierre crecía detrás de mí. Fue disminuyendo hasta que llegue a la orilla con buenas sensaciones.

Salí del agua para descansar un rato. Recogí el equipo y me puse a andar camino del Puntal. Las olas grandes se veían al fondo, a lo largo del recorrido. A mitad de camino volví a entrar al agua. Pasado el zenit de la marea alta el mar se volvió más practicable. Situado ya a 200 metros de la orilla hice un descanso para recuperar fuerzas. Gigantes masas de agua llegaban en serie hasta mi posición. Me levantaban sobre la línea dunar del Puntal consiguiendo ver el Puente de Somo en la distancia. Esperé a la ola adecuada. La ola que nos alza, que abre un camino. La ola que dibuja una ondulación alargada y definida sobre el mar. Imaginando esa ola, seguí esperando. Descartando aquellas olas que no la se parecían. Pensando que en ese día quizás no aparecería esa ola. Volví la mirada hacia el mar abierto. Buscando el comienzo de una gran ola. Pasaron los minutos y pensé en finalizar la jornada. Me encontraba satisfecho con las sensaciones que el mar me había regalado.

Comenzó una nueva serie de olas y volví la vista antes de salir. Una sonrisa apareció en mi cara y espere un momento. A lo lejos asomó una gran masa de agua que sobresalía de la serie. Conforme avanzaba iba tomando forma. Creciendo desde su base y aumentando de tamaño, sin indicios de romper. Se fue acercando hasta mí y empezó a cerrar por la derecha. Cuando alcanzó mi posición me elevó unos 3 metros aproximadamente. Reme y me subí sobre ella. Pegado a la pared de la ola un sonido sordo lo envolvía todo. Después de unos 30 metros de recorrido vi como empezaba a cerrarse del otro lado. Cuando llegué, giré y esquive la rotura. Al otro lado una nueva autopista se abría. Hice un gesto con el cuerpo para girar y volví a subir. Cortando de nuevo la ola, permanecí en la cresta. El agua salpicaba mi cara y me hacia recordar que no estaba soñando. De nuevo sonreí mientras soplaba y movía la cabeza con incredulidad. Seguí surfeando, jugando, quebrando y buscando la velocidad. Ví como la playa se hacia más grande a medida que avanzaba y pensé en llegar hasta allí si era posible.

Un momento después caminaba por la playa con emoción y humilde agradecimiento. Intentaba recordar todas las sensaciones y no me era posible. Aún hoy no consigo retratar con exactitud lo que sentí. Sin embargo me sigo emocionando cuando lo recuerdo.

Giants

Icono Inglés. Icon English Giants 3 meters loaded of energy would beat the coast along the line of beach from Somo to Loredo. Get to where born the waves was difficult. The sea, with each wave, was pushing everything toward the shore and the effort was canceled by the current. A mantle of foam covered part of the water and the sandy bottom was moving. The water tinged with a slight orange tone which showed the hardness of the day.

The predictions of waves insitu had exceeded expectations. Once on the beach, on the verge of going to surf, the vision of an scenario of this type hits the adrenaline. In contact with water, the sea transfers its temperament. After the first 50 meters, the instinct economizes the effort and the precaution is extreme. Each wave that passed over me brought me back to the shore. Its height which were more than a meter, put me in the top. At that moment I saw a great masses of water in the distance that hid the picture of Mouro Island. The last series of waves had been finished, then a period of tense calm was happened. In the end I could see a large wave breaking over itself, its volume was reduced and progressed. Close to my position it raised up to 1.5 meters and began to open to the left again. Placed on the wave, when I was in the top I rowed hard and I tilted forward, I turned to the crest quickly with a maneuver. By drawing the path in the journey, the sound of the closing grew behind me. Was diminishing until I arrived the shore with good sensations.

I got out of the water to relax for a moment. I picked up the board I went toward the Puntal Beach walking over the sand. The big waves were in the background, along the route. Halfway I returned to get into the water. Past the zenit on the high tide the sea became more practicable. When I was located at 200 meters from the shore, I made a break to regain strength. Giant masses of water arrived in series up to my position. I was elevated and I could view over the dune line the Bridge of Somo in the distance. I waited for the proper wave. The wave that we hike, which opens a path. The wave that draws an undulation elongated and defined on the sea. As I was imagining that wave, as I kept waiting for it. I thought that I had to discard those waves because them seemed to be disappear. Thinking in the day and the invisible wave. I returned the gaze to the open sea. Looking for the beginning of a great wave. The minutes passed and I thought to finish the journey. I was satisfied with the sensations that the sea had brought me.

Began a new series of waves and I returned my eyes to them before leaving. A smile appeared on my face and wait a moment. In the distance appeared a large mass of water that jutted out of the series. According to its movement its figure was taking shape. It was growing over its base and it was increasing its size, with no sign of break. Was getting closer to me and began to close from the right. When it reached to my position it had 3 meters approximately. I rowed and I climbed up on the wave. Stuck to the wall of the wave, a powerfull sound wrapped all the environment. After 30 meters of route, I saw as began to close on the other side. When I arrived, I turned and avoided the breakage. On the other side a new highway was opened. I made a gesture with the body to rotate and I returned to climb. Cutting again the new wave, I stayed on the ridge. The water sprayed my face and it made me remember that I wasn´t dreaming. I smiled while I was blowing and moving my head in disbelief. I continued surfing, playing, breaking and looking for the speed. I saw as the beach was near and I thought I would get up there if it was possible.

One moment later I was walking along the beach with emotion and humble gratitude. I was trying to remember all the sensations and it was not possible. Even today I can’t accurately portray what I felt. However it still thrill me when I remember that day.

Icon close Sponsor

Share

Valdearenas ,Liencres; acceso

Icono Español. Icon Spanish La Playa de Valdearenas, También conocida como Liencres, tiene acceso desde el este por Santander, atravesando una ruta pintoresca que cruza parte de la ciudad y las localidades de San Román, Liencres y Soto de la Marina. Finaliza esta ruta por la carretera nacional CA-231. El acceso desde el oeste por Oviedo se realiza por autovía, finalizando el trayecto por la carretera nacional CA-231. El acceso desde Bilbao comienza por el este y finaliza por la parte oeste de la carretera nacional CA-231.

Valdearenas, Liencres; access

Icono Inglés. Icon English Valdearenas Beach, also known as Liencres, has access from the east by Santander, going through a picturesque route that crosses part of the city and the towns of San Roman, Liencres and Soto of the Marina. The end of this travel runs through from the national highway CA-231. The access from the west by Oviedo is performed by motorway, ending the journey from the national highway CA-231. The access from Bilbao begins on the east and ends in the western part of the national highway CA-231.

Icono Español-Inglés. Icon Spanish-English Acceso/Beach Access

Acceso:Valdearenas,Liencres

Icon close Sponsor

Share

Playa de Valdearenas, Liencres; Localización

Icono Español. Icon Spanish La Playa de Valdearenas está situada en la localidad de Liencres, perteneciente al municipio de Piélagos. Esta playa también se conoce con el nombre de su localidad, Liencres. A la Playa de Valdearenas se puede llegar desde Oviedo, Palencia, Santander y Bilbao; como puntos de partida, todos los demás orígenes atraviesan por uno o varios de estos puntos. La llegada a las playas de Liencres no es está indicada en las guías oficiales, es por ello que la ruta finaliza en el Barrio Callejo de liencres. Llegando desde Oviedo encontramos la entrada a las playas antes de llegar al Barrio Callejo. Desde los demás puntos de partida debemos continuar la carratera hasta llegar al Parque natural de las Dunas de Liencres. La entrada esta bien señalizada.

Valdearenas Beach, Liencres; Localization

Icono Inglés. Icon English Valdearenas Beach is located in the town of Liencres, belonging to the municipality of Piélagos. This beach is also known by the name of its locality, Liencres. To the beach of Valdearenas can be reached from Oviedo, Palencia, Santander and Bilbao; as points of departure, all other origins run through one or more of these points. The arrival to Liencres’s beaches is not is indicated in the official guides, is for it that the route finishes in the Neighborhood Callejo of liencres. Coming from Oviedo we find the entry to the beaches before arriving to the Neighborhood Callejo. From other points of item we must continue the road up to coming to the Nature Reserve of Liencres’s Dunes. The entry is well indicated.

Icono Español-Inglés. Icon Spanish-English Localización/Localization

Oviedo, Playa de Valdearenas; Liencres: LocalizationPalencia, Playa de Valdearenas; Liencres : LocalizationBilbao, Playa de Valdearenas; Liencres: LocalizationSantander, Playa de Valdearenas; Liencres; Localization

Share

Lunas de Sangre, eternas

Icono Español. Icon Spanish El 15 de abril sucedió un eclipse total de Luna. Este fenómeno se produce cuando hay un alineamiento casi perfecto entre el Sol, la Tierra y la Luna. Nuestro planeta se antepone al Sol y proyecta su sombra sobre la Luna llena.

Las fases lunares son cuatro y se deben a las distintas y diferenciadas posiciones de nuestro satélite respecto al Sol. La primera fase se conoce como Novilunio o Luna nueva. Esta se da cuando la Luna tiene orientada hacia la Tierra su cara no iluminada. La segunda fase se llama Cuarto Creciente. Transcurrida una semana desde la primer fase y tras dar 1/4 de vuelta, media cara de la Luna se observa iluminada. La tercera fase es la que conocemos como Luna llena o Plenilunio, por efecto de un alineamiento entre los tres astros. La cuarta fase, conocida como Cuarto Menguante, es la última fase que antecede a un nuevo y cíclico comienzo.

Este primer eclipse total de Luna ha iniciado una tétrada de eclipses totales que sucederán cada 6 meses. El segundo eclipse esta previsto que ocurra el 8 de octubre de 2014, el tercero el 8 de abril de 2015 y el último el 28 de septiembre de 2015. La anterior tétrada se produjo hace 10 años y la próxima esta prevista para el año 2032. Está sucesión de fenómenos no es tan habitual, desde 1600; durante 300 años no se produjo ninguna tétrada.

Estos eclipses tendrán un tono rojizo y se conocen como Luna Roja o Luna de Sangre. Teóricamente la Luna no debería estar iluminada, pues en estos acontecimientos está a la sombra de la Tierra y oculta del Sol. El aspecto cobrizo de la Luna es debido al efecto que causa la atmósfera terrestre sobre los rayos solares, pues desvía y absorve los colores azules y deja pasar los colores rojos que iluminan a la reina de las mareas, nuestra Luna.

A continuación se muestra un enlace a un vídeo explicativo.

Separador. DividerIcono Español-Inglés. Icon Spanish-Englishicono camara video Lunas de SangreIcono separador. Icon divider

Blood Moons, eternal

Icono Inglés. Icon English The April 15 happened a total lunar eclipse. This phenomenon occurs when there is an almost perfect alignment between the Sun, the Earth and the Moon. Our planet is prepended to the Sun and casts its shadow on the full Moon.

The lunar phases are four and are due to the different and distinct positions of our satellite in relation to the sun. The first phase is known as Novilunio or New Moon. This occurs when the Moon is showing to the Earth his not illuminated face. The second stage is called First Quarter. After one week from the first phase and after 1/4 turn, half Moon face can be seen illuminated. The third phase is known as Full Moon. It happens when the three stars are in line. The fourth phase known as Third Quarter is the last phase that precedes a new and cyclical begining.

This first total lunar eclipse has initiated a eclipses tetrad that will happen every 6 months. The second eclipse is scheduled to occur on 8 October 2014, the third on 8 April 2015 and the last on 28 September 2015. The previous made occurred 10 years ago and the next is scheduled for the year 2032. This succession of phenomena is not as usual, since 1600; for 300 years there was no made.

These eclipses will have a reddish color and are known as Red or Blood Moon. Theoretically the Moon should not be illuminated, because in these events is in the shadow of the Earth and the Sun. The coppery aspect of the Moon is due to the effect that causes the earth’s atmosphere on the sun’s rays, because it diverts and absorbs the blue colors and passes the red colors that light over the queen of the tides, our Moon.

Click on the icon above to view video.

Icon close Sponsor

Share

Criterios para elegir una tabla de surf

Icono Español. Icon Spanish La elección de una tabla de surf esta determinada por varios factores: estatura, nivel del surfer, tipo de olas a surfear, etc. Son muchos los factores a tener en cuenta, y cada profesional que consultemos puede darnos nuevos matices que amplían nuestros criterios y abren un abanico más amplio de productos a elegir. Sin embargo lo más importante es acertar lo mejor para cada uno cuando vamos a elegir una tabla de surf.

A continuación se da una breve guía, orientativa con los criterios más importantes.

Criterios :

  1. Medidas
  2. Tipos de tablas
  3. Partes de una tabla de surf
  4. Tipos de colas

1 – Medidas.

El sistema de medidas se rige por el sistema de medias inglés, que se da en pulgadas y en pies. 1 pulgada («) = 2,54 cm. 1 pie (‘) = 12 pulgadas.

  • Altura : es la distancia total de la tabla , desde la cola hasta la punta. Esta medida debe estar en función de nuestra estatura. Una tabla larga facilita que podamos coger las olas y reduce la maniobrabilidad. En promedio la altura de la tabla debe superar en 30 cm nuestra estatura.
  • Anchura : es la distancia medida de un canto de la tabla al otro en su parte más ancha. Aporta más estabilidad a la tabla dentro del agua conforme aumenta esta medida.
  • volumen : es el grosor de la tabla en su cara superior (deck) y la inferior (bottom). Aporta flotabilidad a la tabla según aumenta su valor y disminuye la maniobrabilidad ya que la tabla se hace más pesada.

2 – Tipos de tablas.

Separador. DividerIcono Español-Inglés. Icon Spanish-EnglishTipos de Tablas SurfIcono separador. Icon divider

Descripción :

  • Stand-up, paddel board : son tablas diseñadas para ir de pie, y desplazarse o coger olas con ayuda de un remo. Son anchas, con buen volumen y de altura considerable. Son ideales para olas pequeñas y con poca fuerza.
  • Longboard : tabla grande diseñada para un tipo de surf; donde prima la trayectoria y no la maniobra. Adecuada para olas pequeñas y medianas.
  • Gun : su diseño hidrodinámico y afilado hace que sean tablas para olas grandes y coger velocidad, aportando estabilidad. Sólo adecuadas para surfers con buen nivel.
  • Malibú : o minilongboard. Tienen una buena flotabilidad y mayor maniobrabilidad que los longboards. Indicada para iniciarse en el surf y para olas pequeñas.
  • Evolutiva : es la mejor tabla para iniciarse en el surf. De maniobrabilidad , flotabilidad y estabilidad más que aceptables para princpipiantes.
  • Shortboard : son versátibles, ya que ofrecen una relacción de alta calidad entre velocidad, estabilidad y maniobrabilidad. Son tablas que requieren un nivel técnico medio de surf.
  • Retro : están inspiradas en los diseños de los años 70. Requieren un nivel medio de surf. Son indicadas para olas pequeñas y medianas con poca fuerza. Nunca para olas grandes.
  • Fish : son tablas parecidas a las retro. requieren un nivel medio de surf. Son indicadas para olas pequeñas y medianas de mala calidad.
  • Tow-in : son tablas diseñadas para surfear remolcados por una moto acuatica. Requieren un nivel medio-alto de surf.

3 – Partes de una tabla de surf.

Separador. DividerIcono Español-Inglés. Icon Spanish-EnglishSurfboard PartsIcono separador. Icon divider

Descripción :

  • Punta (nose) : es el pico de la tabla. Lo importante es la anchura de la punta. A mayor ancho, mejor se cogen las olas, puesto que tiene más estabilidad.
  • Centro (deck) : es la parte de la tabla sobre la que va el surfer.
  • Tail (cola) : es la parte trasera de la tabla. Determina como la tabla se comporta ante la ola. A más anchura mayor maniobrabilidad, al contrario aumenta nuestro control sobre la tabla.
  • Alma (Stringer) : es un pieza interna y fina de madera, que va desde la punta hasta la cola. Aumenta la dureza de la tabla.
  • Bottom : parte inferior de la tabla que va en contacto con el agua.
  • Cantos (rails) : son los bordes laterales de la tabla. Izquierdos y derechos, superiores e inferiores. A mayor anchura mejor flotabilidad, pero reduciendo la maniobrabilidad.
  • Quillas (fins) : colocadas en la parte inferior de la tabla y de forma perpendicular. Aportan fluidez en las maniobra. Pueden ser fijas o intercambiables, lo cual nos ayuda si queremos adaptarnos a otra forma de surfear.
  • Rocker : es la curvatura de la tabla. A mayor valor mejor maniobrabilidad pero con perdida de velocidad.

4 – Tipos de colas.

Separador. DividerIcono Español-Inglés. Icon Spanish-Englishtipos de colas tablas de surfIcono separador. Icon divider

Descripción :

  • Rounded : proporciona mayor acople a la ola. indicada para olas medianas y grandes.
  • Square : tienen una buena maniobrabilidad y menor estabilidad. La evolución de este tipo de colas es el modelo squash; que consigue mayor estabilidad. Son adecuadas para olas pequeñas.
  • Swallow : tienen buena maniobrabilidad y acople a la ola. Aptas para olas pequeñas.
  • Pin : ofrecen un buen acople a la ola, perdiendo maniobrabilidad. Aptas para olas grandes.

Nota : compra una tabla acorde a tu nivel. Si tienes dudas entre varios modelos pide orientación antes de la compra y acercaté a una escuela de surf para comprobar lo escuchado y probrar las tablas. Por una pequeña cantidad puedes resolverte las dudas en una decisión que te va a acompañar durante varios años.

Criteria for choosing surfboard

Icono Inglés. Icon English The choice of a surfboard is determined by several factors: height, level of surfer, type of waves to surf, etc. There are many factors to take into account, and each professional that we consult you can give us new nuances that extend our criteria and open up a wider range of products to choose from. However the most important thing is to guess the best for each one when we are going to choose a surfboard.

Below is a brief guide, indicative with the most important criteria.

Criteria :

  1. Measures
  2. Surfboard types
  3. Parts of a surfboard
  4. Tail types

1 – Measures.

The system of measures is governed by the English system, which is given in inches and feet. 1 Inch («) = 2.54 cm. 1 Foot (‘) = 12 inches.

  • Height : is the total distance of the table, from the queue to the tip. This measure must be based on our height. A long surfboard makes it easier to be able to catch the waves and reduces the maneuverability. On average, the height of the surfboard has 30 cm over our stature.
  • Width : this is the measured distance of an edge of the surfboard to the other at its widest part. Provides more stability to the surfboard inside the water, it increases according with this measure.
  • volume : is the thickness of the table between its upper face (deck) and lower (bottom). It brings buoyancy to the surfboard. As increases, decreases its manoeuvrability due to the surfboard becomes more heavy.

2 – Surfboard types.

Surf types Picture : see above.

Description :

  • Stand-up paddle board : these surfboards are designed to go on foot, and scroll or ride the waves with the help of an oar. them are wide, with good volume and of considerable height. Them are ideal for smaller waves and with little force.
  • Longboard : large table designed for a type of surf; where the raw path and not the maneuver. Suitable for small and medium waves.
  • Gun : its hydrodynamic design and sharp makes them surfboards for big waves. You can get speed with a good stability. Only suitable for surfers with good level.
  • Malibu : or minilongboard. Them have a good buoyancy and greater maneuverability that longboards. Indicated to start in the surf and with small waves.
  • Evolutionary : is the best surfboard to start in the surf. The manoeuvrability , buoyancy and stability for beginners is more than acceptable.
  • Shortboard : them are versatibles, because them offer us a high quality of speed, stability and maneuverability. These surfboards require a medium technical level of surfing.
  • Retro : them are inspired by the designs of the 70s. You must have a medium level of surfing. Are indicated for small and medium waves with little force. Never use for big waves.
  • Fish : these surfboards are similar to the retro. You must have a medium level of surfing. Them are indicated for small and medium waves of poor quality.
  • Tow-in : them are designed for surf towed by a jet ski. You must have a mid-high level of surfing.

3 – Parts of a Surfboard.

Parts of a Surfboard Picture : see above.

Description :

  • nose : it is the peak of the surfboard. The main concept is the width of the tip. With higher values it will grab to the waves better, as it has more stability.
  • deck : it is the part of the surfboard on which the surfer goes.
  • Tail : is the rear of the table. Determines how the table behaves with the wave. When it is more width the board has greater maneuverability, on the contrary it increases our control on the table.
  • Stringer : it is an internal and fine wood part which goes from the nose to the tail. Increases the hardness of the surfboard.
  • Bottom : is the side of the surfboard that is in contact with water.
  • rails : them are the side edges of the surfboard. Left and right, upper and lower. With a greater width of them you will have better buoyancy, but you will reduce the maneuverability.
  • Fins : them are placed at the bottom of the table and perpendicular. Them give to the surfboard more fluidity in the maneuver. Them can be either fixed or interchangeable which helps us to surfing with another style.
  • Rocker : is the curvature of the table. The higher the value better maneuverability but with loss of speed.

4 – Tail types.

Tail types Picture : see above.

Description :

  • Rounded : it provides greater grip to the wave. Suitable for medium and large waves.
  • Square : it have a good manoeuvrability and less stability. The evolution of this type is the squash type; that achieves greater stability. They are suitable for small waves.
  • Swallow : it have good maneuverability and grip to the wave. Suitable for small waves.
  • Pin : it offer a good coupling to the wave, losing maneuverability. Suitable for big waves.

Note : you should purchase a surfboard according to your level. If you have doubts among several models requests guidance prior to purchase. You can go to a surf school to verify what has been heard . You can rent it by a small amount and that would avoid any future insatisfaction.

Icon close Sponsor

Share

Olas gigantes en Cantabria

Icono Español. Icon Spanish Cantabria cuenta con el registro de la ola más grande que se ha detectado en el litoral español, con un tamaño de 26.13 metros. El último invierno, la sucesión de temporales originó olas de más de 20 metros frecuentemente. Fuera de condiciones extremas, existen dos olas gigantes en Cantabria … Leer más Icono. Icon

Icono Inglés. Icon English Cantabria account with the registration of the biggest wave that has been detected on the Spanish coast, with a size of 26.13 meters. The last winter, the succession of storms produced waves over than 20 meters frequently. Out of extreme conditions, there are in Cantabria two giant waves … Read more Icono. Icon

Giant waves in Cantabria

Separador. DividerIcono Español-Inglés. Icon Spanish-EnglishIcono. IconIcono separador. Icon divider

Icon close Sponsor

Share

Somo. Adrenalina primaveral

Icono Español. Icon Spanish La primavera entró el 20 de marzo. Lejos quedan los días de invierno en los que los temporales azotaban el Mar Cantábrico. El inicio de la estación trajo lluvia y la temperatura del agua rondaba los 12 grados. Conforme la Luna va cambiando de perfil, las horas de Sol han ido aumentando; calentando el agua tibiamente. En algunas fechas posteriores se han registrado temperaturas superiores a los 20 grados. Pero el mar sigue su curso y se mide por otra escala. Actualmente el agua se encuentra en 14 grados.

El primer fin de semana de abril paró la lluvia y el Sol se reflejaba sobre la superficie del mar. La predicción de olas estaba entre 1 y 2 metros de altura, así que el viaje hasta Somo transportaba buenas sensaciones. Pocos aparcamientos libres y mucha gente se agolpaba a lo largo del paseo que roza la arena. Los efectos del invierno que los edificios mostraban captaban la atención de los paseantes y al fondo un goteo de surfers se encaminaba a la playa con impaciencia. Nos dirigimos hacia el mismo lugar. Una especie de trance impregnaba el recorrido. El sonido de las olas iba creciendo. Al entrar en la playa vimos como una ola rizada cruzaba de izquierda a derecha. Una sonrisa y al agua.

Nacían las olas a media distancia y su trayecto se marcaba hasta la orilla. Allá que nos fuimos. Allí que llegamos. Soplaba un viento que esculpía las olas presentadolas como una pared de agua. A los cinco minutos una ola asomó a lo lejos y fue cogiendo tamaño. Cuando llegó hasta nuestra posición alcanzaba los dos metros. Remando con fuerza conseguí viajar en la cima. La cresta no cedía y mantenía el muro de agua unos metros más. La sensación de vértigo inicial disparó la adrenalina cuando fui consciente de ello. Me deslicé a la izquierda dibujando media luna. Regrese hacia la ola para chocar con la pared y volver a bajar. El agua a mi alrededor bullía. Eran las olas, era la mar, el Sol que radiaba, era la pasión que llegaba al corazón.

Somo. Spring adrenaline

Icono Inglés. Icon English The spring entered on March 20. The winter days in which the storms broke the Cantabrian Sea were far away. The beginning of the station brought rain and the temperature of the water was about 12 grades. The same way as the Moon was changing profile, the hours of the Sun had been increasing and the water was warming indifferently. In some later dates there were registered temperatures up to 20 grades. But the sea continues its course and its measures has another scale. At present the water is in 14 grades.

The first weekend of April the rain had stopped and the Sun reflected on the surface of the sea. The prediction of waves was between 1 and 2 meters in height, so the trip to Somo was carrying good sensations. Few parking free and many people lined up along the walkway that rubs against the sand. The effects of winter that the buildings showed captured the attention of passers-by. At the end of the image some surfers went to the beach with impatience. We headed toward the same place. A sort of trance permeated the tour. The sound of the waves grew. Upon entering the beach we saw as a wave curly crossing from left to right. One smile in each one and we went to the water.

The waves had borned at half distance and its trajectory was marked up to the shore. There was where we went . There was where we arrived. There was a wind that was sculpting the waves and showing it to us like a water wall. In a few minutes a wave began to be shown in the distance and it was taking size. When it came even our position was reaching two meters. Paddling strongly I managed to travel in the top. The crest was not broken and the water wall was maintaining some meters more. The sensation of initial dizziness shot the adrenaline when I realized it. I slid to the left through a maneuver like a half moon. I Returned towards the wave to ride with the wall and to went down again. The water around me was boiling. There were the waves, it was the sea, the Sun that it was lighting, it was the passion that was coming to the heart.

Separador. DividerSomo.  Surf SpringIcono separador. Icon divider

Icon close Sponsor

Share

Playa de Mataleñas. Una cala dentro de Santander

Icono Español. Icon Spanish La playa de Mataleñas está situada en la ciudad de Santander. Se encuentra emplazada entre Cabo Menor y Cabo Mayor. Su arenal tiene 125 metros de longitud y una anchura aproximada de 40 metros. Flanqueada por acantilados que esculpe el Mar Cantábrico, estas barreras naturales acompañan a la cala 250 metros antes de llegar a mar abierta.

Localización : una vez situados en la ciudad de Santander, nos dirigiremos hacia la Segunda Playa del Sardinero. Desde allí cogemos dirección al Faro de Cabo Mayor. Pasado el Barrio de Valdenoja, subiendo la cuesta, al final hay un desvío a mano derecha que da acceso a un mirador desde donde contemplar parte de la Bahía de Santander y la Playa de Mataleñas.

Acceso : cuenta con un pequeño parking cercano a su escalinata de entrada. Se baja a la playa a través de las escaleras que traducen una altitud de 40 metros, hasta amenizar a nivel del mar, en un pequeño balcón abarandillado que nos presenta la cala de una forma singular.

La playa de Mataleñas es apta para el baño, ir de comida, pesca a surfcasting y el submarinismo. Sus aguas limpias y de color azul verdoso traslucen parte del paisaje submarino que puede encontrarse al bucear en la zona. Lubinas, doradas, perlas, cabras, cabrachos y agujones son algunas de las especies de peces que vamos a encontrar. Acompañados de crustáceos y algas rodeados por cuevas y roca tallada por el Cantábrico.

La playa de Mataleñas se comunica con los siguientes puntos : Faro de Cabo Mayor, Cabo Menor, Parque de Mataleñas, recorrido periférico del Campo de Golf de Mataleñas, El Sardinero. Es por ello que se convierte en una zona ideal para realizar rutas de senderismo con diversos recorridos.

Separador. DividerIcono Español-Inglés. Icon Spanish-Englishaccess, localization: mataleñas beachIcono separador. Icon divider

Beach of Mataleñas. A cove within Santander

Icono Inglés. Icon English The Beach of Mataleñas is located in the city of Santander. It is placed between Cabo Menor and Cabo Mayor. Its arenal has 125 meters in length and a width of approximately 40 meters. Flanked by cliffs that sculpts the Cantabrian Sea, these natural barriers accompany the cove through 250 meters before arriving to open sea.

Location : once placed in the city of Santander, we go toward the Second Sardinero Beach. From there take the road to the Lighthouse Cabo Mayor. Then the last neighborhood, Valdenoja. Just up the hill, at the end, there is a diversion on the right hand which gives access to a vantage point from where you can watch part of the Santander Bay and the Beach of Mataleñas.

Access : account with a small parking close to its entrance staircase. You can arrive to the beach through the stairs. That translate an altitude from 40 meters to sea level. At the end, an small balcony balustraded presented to us the cove in a singular way.

The beach Mataleñas is suitable for the bathroom, picnic, surfcasting and scuba diving. Its clean waters and greenish blue color show part of the underwater scenery that can be found when diving in the area. Sea Bass, golden, pearls, goats, scorpion fish and agujones are some of the species of fish that we are going to find. Accompanied by crustaceans and algae surrounded by caves and rock carved by the Cantabrian Sea.

The beach of Mataleñas communicates with the following points: Lighthouse Cape Mayor, Cape Menor, Mataleñas’s Park, peripheral road of Mataleñas’s Golf course, The Sardinero. It is for it that turns into an ideal zone to realize routes of trekking with diverse tours.

Icon close Sponsor

Share

Criterios para elegir un bodyboard

Icono Español. Icon Spanish Elegir un bodyboard no es algo sencillo debido a los parámetros que componen su diseño y a todas las combinaciones que pueden generar. Por ejemplo para 4 factores a tener en cuenta ( que pueden ser muchos más) combinados entre sí generan 256 bodyboards distintos. A esto se suma la gran variedad de fabricantes y que cada uno cuenta con una amplia gama de modelos. ¿ Cómo elegir ? . La principal orientación sobre esta decisión la marca el uso que de él vamos a hacer. Para ello los principales parámetros son los siguientes :

1 – Tallaje.
2 – Partes de un bodyboard.
3 – Materiales.

1 – Tallaje : el sistema de tallas se establece en pulgadas (1 pulgada = 2,54 cm) y nos sirve para conocer que talla es la más adecuada para cada uno. Éste es el criterio básico para elegir un bodyboard. Pues si la talla es grande respecto del surfer, no permite maniobrar. Si por el contrario es pequeña, sólo funcionará con las olas más potentes; perdiendo estabilidad y seguridad.

Separador. DividerIcono Español-Inglés. Icon Spanish-English

Size – length (inch) Height (cm) Weight (kg)
37″ 123-153 cm 28-55 kg
37.5″ 130-155 cm 30-55 kg
38″ 135-155 cm 35-58 kg
38.5″ 138-158 cm 36-58 kg
39″ 137-158 cm 38-58 kg
39.5″ 140-162 cm 40-60 kg
40″ 157-167 cm 42-62 kg
40.5″ 158-170 50-80 kg
41″ 160-173 cm 55-85 kg
41.5 165-179 cm 60-90 kg
42″ 168-183 65-95 kg
42.5″ 170-190 cm 70-100 kg
43″ 172-195 70-105 kg
44″ 175-195 cm 75-130 kg
45″ 175-195 cm 75-130 kg
46″ + 195 cm + 100 kg

Icono separador. Icon divider

2 – Partes de un bodyboard.

Separador. DividerIcono Español-Inglés. Icon Spanish-EnglishDibujo Partes BodyboardIcono separador. Icon divider

Nose (pico): parte superior. Si es más ancho nos permite situar el peso hacia adelante, para surfear tumbado (prone). Si es más estrecho favorece desplazar el peso hacia atrás, para surfear de rodillas (dropknee).
Tail (cola): parte inferior. Cada tipo de cola está indicado para un tipo de olas y maniobras diferentes. Las dos grandes categorías son : crescent tail y bat tail. Dentro de cada categoría hay muchas variantes. Las principales categorías son :

  • Crescent tail : para olas grandes, el bodyboard se acopla bien a la pared de la ola.
  • Bat tail : aportan mayor maniobrabilidad, pero el bodyboard pierde acoplamiento en la pared de la ola.

Separador. DividerIcono Español-Inglés. Icon Spanish-EnglishTipos  colas de bodyboardIcono separador. Icon divider

Wide point : parte más ancha.

Deck : cara sobre la que se tumba el surfer.

Slick : cara que va en contacto con el agua.

Rails (bordes): bordes laterales del bodyboard, superiores e inferiores. Estos bordes se figuran en forma de ángulo siendo su parte inferior y superior separadas por el punto de inflexión. Cumplen la función de quillas, anclan nuestra trayectoria al camino de la ola, cuando cortamos la ola. Su medidas habituales son: (borde inf.)60/40(borde sup.) y 50/50. Cuanta mayor diferencia existe entre estas medidas hay mayor acoplamiento a la pared de la ola.

Stringer : listón flexible y duro generalmente de carbono. Colocado en el interior verticalmente, para proporcionar mayor resistencia al bodyboard.

Channels (canales) : proporcionan mayor acople a la ola, disminuyen ligeramente la maniobrabilidad.

– Diferencia entre nose y wide point : proporciona mayor capacidad de giro según el valor aumenta.

3 – Materiales.

Los materiales usado para constuir un bodyboard se centran principalmente en tres partes, cada una de ellas tiene una gama de calidades.

  • Slick : (de mayor a menor calidad) surlyng, HDPP, HDPE.
  • Deck : (para gustos)
    • Sealed-air: célula abierta, es más blando.
    • Crosslink : célula cerrada, no absorbe agua y es más rígido.
  • Core : es la parte interna del bodyboard. Las calidades, de menor a mayor; son las siguientes :
    • Dow : blando y pesado, baja calidad.
    • PE (Polietileno) : es más pesado que PP. Adecuado para aguas frías.
    • EFC (Engineered Flexible Core): evolución de PE, mantiene sus propiedades; siendo más ligero y
      totalmente impermeable.
    • PP (Polipropileno) : muy ligero. Adecuado para aguas calientes. Alta calidad.

Nota : tener precaución al colocar el invento (correa elástica de sujeción) para no dañar ninguna parte del bodyboard (stringer).

Resumen: estos son los principales criterios para elegir un bodyboard. Tener en cuenta que la calidad está relacionada con el precio, aunque esto no siempre se cumple. Debido a la durabilidad de un bodyboard quizás es recomendable aumentar la cantidad a invertir, primando calidad y funcionalidades; dependiendo del uso y nuestra frecuencia de surf, pero esta decisión corresponde a la libre elección de cada uno.

Criteria for choosing a bodyboard

icono bandera Reino UnidoTo choose a bodyboard is not something simple because of the parameters that make up its design and all the combinations that can be generate. For example for 4 factors to take into account ( which can be many more) generate 256 different bodyboards. This is compounded by the wide variety of manufacturers and that each one have a wide range of models. How do you choose? . The main guidance on this decision are the place and style that we’re going to play. The main parameters are the following ones :

1 – Sizing.
2 – Parts of a bodyboard.
3 – Materials.

1 – Sizing: the system of sizes settles down in inches (1 inch = 2,54 cm) . It allow us to know the size that is the most appropriate for each one. This one is the basic criterion to choose a bodyboard. If the size is bigger than the ideal one for the surfer, it does not allow to maneuver. If on the contrary it is small, only it will work with the most powerful waves; with less stability and safety.

Size chart. See above.

2 – Parts of a bodyboard.

Bodyboard parts Picture. See above.

Nose (peak): top. When it is width enables us to place the weight forward, to surfing down (prone). The small width of it allow us to place the weight backwards, to surf over the knees (dropknee).

Tail (queue): bottom. Each type of tail is indicated for a kind of waves and different maneuvers. The two major categories are : crescent tail and bat tail. Within each category there are many variants. the main categories are:

  • Crescent tail : for big waves, the bodyboard attaches securely to the wall of the wave.
  • Bat tail : delivering greater maneuverability, but loses the bodyboard coupling on the wall of the wave.

Tails Picture. See above.

Wide point : widest part.
Deck : face on the surfer.
Slick : side to be in contact with water.
Rails : side edges of the bodyboards, upper and lower. These edges are contained in the form of angle being their top and bottom separated by the inflection point. Them play the role of keels, anchored our path to the path of the wave, when we cut off the wave. Its customary measures are: (bottom )60/40 (top) and 50/50. The difference between these measures increase the coupling to the wall of the wave.

Stringer : stick generally flexible and hard, usually manufactured in carbon. Placed inside the bodyboard and vertically, to provide greater resistance for the bugui.

Channels : provide greater union to the wave. Them slightly diminish the maneuverability.

– Difference between nose and wide point : provides more maneuverability according to the increase of the value.

3 – Materials. The materials used to build a bodyboard is focused mainly in three parts, each one of them has a range of qualities.

  • Slick : (from highest to lowest quality) surlyng, HDPP, HDPE.
  • Deck : (to taste)
    • Sealed-air: open cell, is softer.
    • Crosslink : closed cell, does not absorb water and is more rigid.
  • Core : is the internal part of the bodyboard. From lowest to highest quality ; them are the following :
    • Dow : soft and heavy, low quality.
    • PE (Polyethylene) : it is heavier than PP. Suitable for cold waters.
    • EFC (Engineered Flexible Core): evolution of PE, maintains its properties; still more lightweight and
      completely waterproof.
    • PP (Polypropylene) : very lightweight. Suitable for hot waters. High quality.

Note: Use caution when placing the leash not to damage any part of the bodyboard (stringer).

Summary: these are the principal criteria to choose a bodyboard. Bear in mind that the quality is related to the price, though this not always is fulfilled. Due to the durability of a bodyboard probably it is advisable to increase the quantity to invest, giving priority to quality and functionalities; depending on the use and our frequency of surfing, but this decision corresponds to the free choice of each one.

Icon close Sponsor

Share